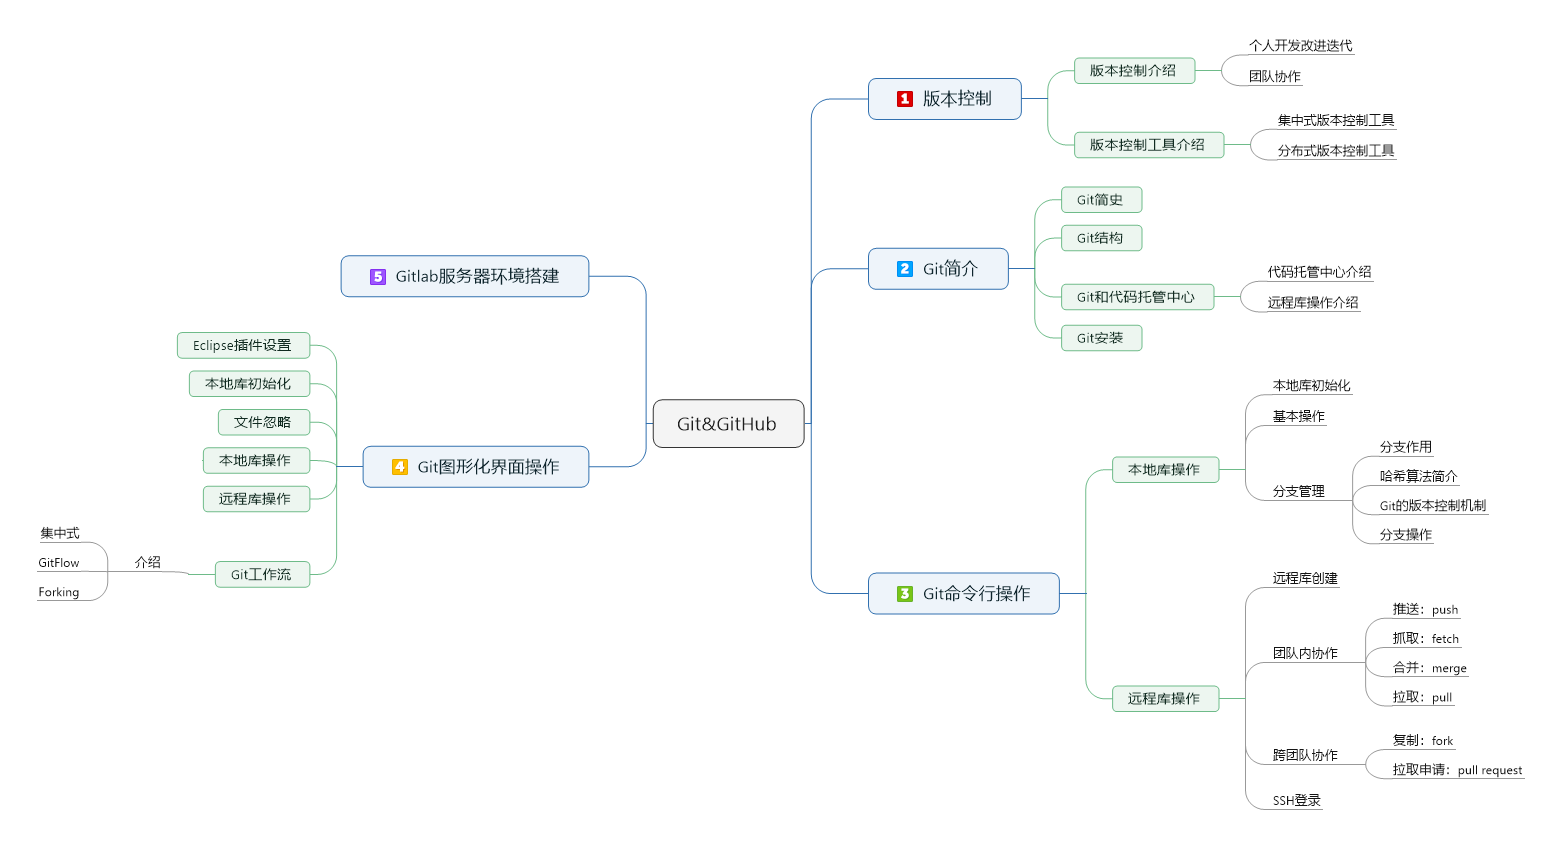
个人笔记
SongPinru 的小仓库
GIT

Git指令
git status
git checkout branch
#回滚文件
git restore --staged file #add撤销,工作区不变
git reset file #同上
git restore file#从缓存区或HEAD把文件拿到工作区
git checkout file #同上

#把分支从远程抓到本地,-p是先删除本地在抓
git fetch [-p --prune] remote branch
#本分支更新,本地落后于remote使用
git pull
#本分支更新,和其他人一起改一个分支的时候使用,推荐使用这个
git pull --rebase
#和另一个分支(服务器上的)合并,主分支合并其他分支时使用
git pull remote branch
#和主分支同步基点(服务器的)
git pull --rebase remote branch
#本地合并使用,推荐使用pull
git merge branch
#也是分支同步,用于本地
git rebase branch
#合并或删除commit(squash,pick,reword,drop)
git rebase -i hash
#覆盖提交(和上一个commit合并)
git commit --amend

#最后push到远程
git push [-f --force] [-d --delete] [-n --dry-run] [--progress] [-q --quiet]
| command | description |
|---|---|
| git init project name | 初始化仓库 |
| git config [–global] user.name “name” | 设置签名的name |
| git config [–global] user.email “email” | 设置签名的email |
| git config --global color.ui auto | 全局字体颜色(true,flase,auto),auto就好 |
| git add file | 将文件添加进缓存区 |
| git commit -m “describe” file | 把文件提交到本地仓库 |
| git status | 显示仓库状态 |
| git reset file | 删除缓存区的文件(add的回撤,从缓存区拿到本地) |
| git rm file | 删除文件(仓库,缓存区,工作区) |
| git rm –cached file | 删除文件(仓库,缓存区) |
| git mv file-ogitriginal file-rename | 改名 |
| git log | 历史记录(空格向下翻页,b向上翻页) |
| git log –pretty=oneline | 完整hash码的oneline |
| git log –oneline | 简约hash码的oneline |
| git log –follow file | 文件的所有改动记录 |
| git reset –hard HEAD~n | 文件后退n步 |
| git reset –hard hash-index | 文件恢复至某版本(本地库HEAD,缓存区,工作区) |
| git reset –soft hash-index | 文件恢复至某版本(本地库HEAD) |
| git reset –mixed hash-index | 文件恢复至某版本(本地库HEAD,缓存区) |
| git diff file | 将工作区中的文件和暂存区进行比较 |
| git diff history-hash file | 将文件和某版本对比 |
| git branch name | 新增分支 |
| git branch -v | 查看分支 |
| git branch -d name | 删除分支 |
| git checkout name | 切换分支 |
| git checkout file | rollback某个文件 |
| git merge other-name | 合并分支(other->master) |
| » git add file | 分支冲突后操作 |
| » git commit -m | 分支冲突后操作 |
| git remote -v | 查看所有别名 |
| git remote add 别名 URL | 新增别名 |
| git push URL branch-name | 把分支推送到远程仓库 |
| git clone URL | 从远程仓库克隆到本地(master) |
| git fetch URL branch-name | 抓取某一分支 |
| git merge 别名/branch-name | 抓取后合并分支 |
| git pull 别名 branch-name | 拉取分支=fetch+merge |
SSH 登录
# 1. 进入当前用户的家目录
 $ cd \~
 $ rm -rvf .ssh		*删除.ssh 目录*
# 2. 运行命令生成.ssh 密钥目录
 $ ssh-keygen -t rsa -C **email** [^email]
 [注意:这里-C 这个参数是大写的 C]
# 3. 进入.ssh 目录查看文件列表
 $ cd .ssh
 $ ls -lF
# 4. 查看 id_rsa.pub 文件内容
 $ cat id_rsa.pub
# 5. 复制 id_rsa.pub 文件内容,登录 GitHub,点击用户头像→Settings→SSH and GPGkeys
点击New SSH Key 输入复制的密钥信息 回到 Git bash 创建远程地址别名 git remote add origin_ssh 1
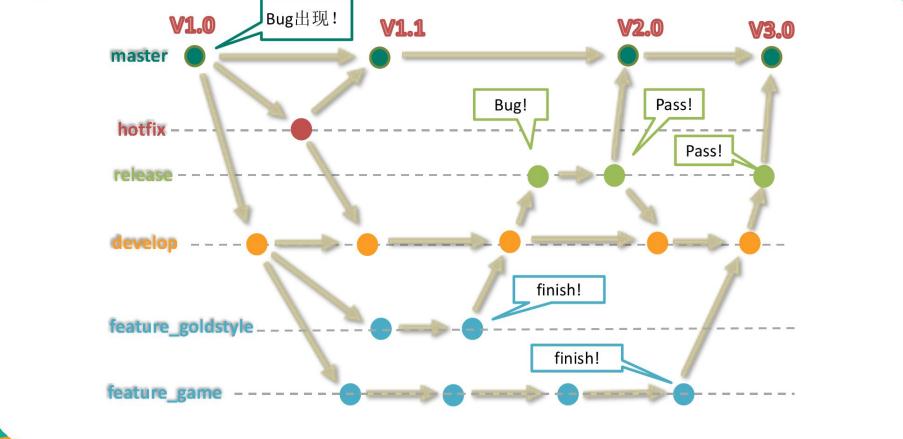
GitFlow

Gitlab 服务器搭建过程
官网地址
首页:https://about.gitlab.com/ 安装说明:https://about.gitlab.com/installation/
安装命令摘录
sudo yum install -y curl policycoreutils-python openssh-server cronie
sudo lokkit -s http -s ssh
sudo yum install postfix
sudo service postfix start
sudo chkconfig postfix on
curl https://packages.gitlab.com/install/repositories/gitlab/gitlab-ee/script.rpm.sh | sudo bash
sudo EXTERNAL_URL="http://gitlab.example.com" yum -y install gitlab-ee
实际问题:yum 安装 gitlab-ee(或 ce)时,需要联网下载几百 M 的安装文件,非常耗 时,所以应提前把所需 RPM 包下载并安装好。 下载地址为: https://packages.gitlab.com/gitlab/gitlab-ce/packages/el/7/gitlab-ce-10.8.2-ce.0.el7.x86_64.rpm 调整后的安装过程
sudo rpm -ivh /opt/gitlab-ce-10.8.2-ce.0.el7.x86_64.rpm
sudo yum install -y curl policycoreutils-python openssh-server cronie
sudo lokkit -s http -s ssh
sudo yum install postfix
sudo service postfix start
sudo chkconfig postfix on
curl https://packages.gitlab.com/install/repositories/gitlab/gitlab-ce/script.rpm.sh | sudo bash
sudo EXTERNAL_URL="http://gitlab.example.com" yum -y install gitlab-ce
当前步骤完成后重启。
gitlab 服务操作
#初始化配置 gitlab
gitlab-ctl reconfigure
#启动 gitlab 服务
gitlab-ctl start
#停止 gitlab 服务
gitlab-ctl stop
浏览器访问
访问 Linux 服务器 IP 地址即可,如果想访问 EXTERNAL_URL 指定的域名还需要配置 域名服务器或本地 hosts 文件。
Github 私有服务器搭建
上一章节中我们远程仓库使用了 Github,Github 公开的项目是免费的,2019 年开始 Github 私有存储库也可以无限制使用。
这当然我们也可以自己搭建一台 Git 服务器作为私有仓库使用。
接下来我们将以 Centos 为例搭建 Git 服务器。
1、安装Git
$ yum install curl-devel expat-devel gettext-devel openssl-devel zlib-devel perl-devel
$ yum install git
接下来我们 创建一个git用户组和用户,用来运行git服务:
$ groupadd git
$ useradd git -g git
2、创建证书登录
收集所有需要登录的用户的公钥,公钥位于id_rsa.pub文件中,把我们的公钥导入到/home/git/.ssh/authorized_keys文件里,一行一个。
如果没有该文件创建它:
$ cd /home/git/
$ mkdir .ssh
$ chmod 755 .ssh
$ touch .ssh/authorized_keys
$ chmod 644 .ssh/authorized_keys
3、初始化Git仓库
首先我们选定一个目录作为Git仓库,假定是/home/gitrepo/runoob.git,在/home/gitrepo目录下输入命令:
$ cd /home
$ mkdir gitrepo
$ chown git:git gitrepo/
$ cd gitrepo

$ git init --bare runoob.git
Initialized empty Git repository in /home/gitrepo/runoob.git/
以上命令Git创建一个空仓库,服务器上的Git仓库通常都以.git结尾。然后,把仓库所属用户改为git:
$ chown -R git:git runoob.git
4、克隆仓库
$ git clone git@192.168.45.4:/home/gitrepo/runoob.git
Cloning into 'runoob'...
warning: You appear to have cloned an empty repository.
Checking connectivity... done.
192.168.45.4 为 Git 所在服务器 ip ,你需要将其修改为你自己的 Git 服务 ip。
这样我们的 Git 服务器安装就完成。
资料
- [ ]
-
git@github.com:example2018ybuq/huashan.git ↩