个人笔记
SongPinru 的小仓库
RUST
注释
-
普通注释,其内容将被编译器忽略掉:
-
// 单行注释,注释内容直到行尾。 -
/* 块注释, 注释内容一直到结束分隔符。 */ -
文档注释,其内容将被解析成 HTML 帮助文档:
-
/// 为接下来的项生成帮助文档。 -
//! 为注释所属于的项(译注:如 crate、模块或函数)生成帮助文档。
文档注释也分为单行注释和块注释,但又有内外之分:
-
内部文档注释(Inner doc comment)
-
单行注释(以 /// 开头)
-
块注释(用 /** … */ 分隔)
-
-
外部文档注释(Outer doc comment)
-
单行注释(以 //! 开头)
-
块注释(用 /*! … */ 分隔)
-
二者的区别:
内部文档注释是对它之后的项做注释,与使用 #[doc=”…”] 是等价的。 外部文档注释是对它所在的项做注释,与使用 #![doc=”…”] 是等价的。
Formatted Print
使用方式:
format!: 将格式化文本写入Stringprint!: 相同,format!但文本打印到控制台 (io::stdout)。println!: 相同,print!但附加了换行符。eprint!: 相同format!但文本打印到标准错误 (io::stderr)。eprintln!: 相同,eprint!但附加了换行符。write!:writeln!:format_args!:
规则:
{arg:spec}
spec: ((填充:char)对齐:<^>)(签名:+ 或-)(#:漂亮打印)(补零:0)(长度:usize)(精度:.usize)(类型:EeXxobp)(debug:?)
usize:只能是整型,如果是别名需要后缀’$’
Ee:科学计数法使用E还是e
Xx:16进制大写还是小写
o:八进制
b:二进制
p:使用内存地址
debug:输出完整的
漂亮打印:进制加前缀,debug输出转义
format_string := text [ maybe_format text ] *
maybe_format := '{' '{' | '}' '}' | format
format := '{' [ argument ] [ ':' format_spec ] '}'
argument := integer | identifier

format_spec := [[fill]align][sign]['#']['0'][width]['.' precision]type
fill := character
align := '<' | '^' | '>'
sign := '+' | '-'
width := count
precision := count | '*'
type := '' | '?' | 'x?' | 'X?' | identifier
count := parameter | integer
parameter := argument '$'
实例:
// 基础替换,{}对应后续的值,括号数和值的数要一致
println!("{} days", 31);
// 转义,两个会转义成{和}
println!("Hello ");
// 序列(数组)替换,用下标指定值
println!("{0}, this is {1}. {1}, this is {0}", "Alice", "Bob");

// 别名替换,使用别名指定值
println!("{subject} {verb} {object}",
    object="the lazy dog",
    subject="the quick brown fox",
    verb="jumps over");

// 对齐&填充
// :{字符}{方向:<^>}{长度} 指定填充字符和对齐方式
assert_eq!(format!("Hello {:<5}!", "x"),  "Hello x    !");
assert_eq!(format!("Hello {:-<5}!", "x"), "Hello x----!");
assert_eq!(format!("Hello {:^5}!", "x"),  "Hello   x  !");
assert_eq!(format!("Hello {:>5}!", "x"),  "Hello     x!");
// :后的长度要使用参数指定,需末尾加$(只接受usize)
println!("Hello {:5}!", "x");
println!("Hello {:1$}!", "x", 5);
println!("Hello {1:0$}!", 5, "x");
println!("Hello {:width$}!", "x", width = 5);

// 签名
+- 这适用于数字类型,表示应始终打印符号。默认情况下从不打印正号,默认情况下仅对有符号值打印负号。此标志表示应始终打印正确的符号 (+或-)。
- - 目前未使用
# - 此标志表示应使用“替代”打印形式。替代形式是:
#? - 漂亮打印Debug格式(添加换行符和缩进)
#x - 在参数前面加上一个 0x
#X - 在参数前面加上一个 0X
#b - 在参数前面加上一个 0b
#o - 在参数前面加上一个 0o
0 - 这用于指示整数格式的填充width既应使用0字符完成,又应具有符号意识。类似的格式{:08}会产生00000001整数1,而相同的格式会产生-0000001整数-1。请注意,负版本比正版本少一个零。请注意,填充零始终位于符号(如果有)之后和数字之前。当与#标志一起使用时,适用类似的规则:在前缀之后但在数字之前插入填充零。前缀包含在总宽度中。
数据类型
标量类型
- 有符号整数:
i8,i16,i32,i64,i128和isize(32/64,依赖架构) - 无符号整数:
u8,u16,u32,u64,u128和usize(32/64,依赖架构) - 浮点数:
f32,f64 charUnicode 标量值,如'a','α'和'∞'(每个 4 个字节)bool布尔值,true或false- 和 unit type
(),其唯一可能的值是一个空元组:()
尽管 unit type的值是一个元组,但它不被视为复合类型,因为它不包含多个值。表达式的默认返回值。
可以在数字文字中插入下划线以提高可读性,例如 1_000与 相同1000,并且0.000_001与 相同0.000001。
复合类型
- 元组
(1, true),签名:(T1, T2, …),类型不需要一致- 空元组和unit不一样,不是所有空元组都是unit
- 元组里面必须有
,,单一元组后面要加,,否则就是表达式了 - 元组调用:
expr.0,expr.1, etc.
- 数组
[1, 2, 3],签名:[T; length],类型必须一致 - 切片slice:类似于软拷贝,不保存值,只保存地址和长度,签名:&[T] ,如:&s[0..9]
自定义类型
Rust 自定义数据类型主要通过两个关键字形成:
struct: 定义一个结构
-
元组,命名元组,指定具体的元组类型,使用()
- struct Pair(i32, f32);
- 可以理解为字段名匿名的结构体,在不关心字段名时使用
-
字段,使用{}
-
struct Point {
x: f32,
y: f32,
}
-
==实例化时使用:而不是===
-
..为结构体更新语法,如果其他属性与另一个对象一致,可以省略,但是旧的结构体对象会无法使用,因为这里是move语义(所以叫更新语法)
let user2 = User {
    active: user1.active,
    username: user1.username,
    email: String::from("another@example.com"),
    sign_in_count: user1.sign_in_count,
};

let user2 = User {
    email: String::from("another@example.com"),
    ..user1
};
enum: 定义一个枚举
枚举更像是一个多个结构体的集合,子项由结构体或者元组组成
enum WebEvent {
    // An `enum` may either be `unit-like`,
    PageLoad,
    PageUnload,
    // like tuple structs,
    KeyPress(char),
    Paste(String),
    // or c-like structures.
    Click { x: i64, y: i64 },
}
//如果没有显式的标注()或{},则enum是有符号值(即isize),此时可以指定isize值
enum Logger{
    None=1,//如果写成None(),无法指定isize,因为此时指定的其实是名为None的元组,已经不是primitive值了
    Info=3,
    Warn=5,
    Error=7,
}
//使用指定的isize方法 self as usize
内存布局
struct&tuple
struct和tuple不保证字段顺序,这样可以对齐时补充的最少,struct和tuple必须和操作系统内存对齐。
struct Foo{
    count: u8,
    data1: u32,
    data2: u16,
}

// 编译器实际可能的内存布局
//struct Foo {
//    count: u8,
//    data2: u16,
//    _pad1:u8,
//    data1: u32,
//}
enum
enum Foo {
    A(u32),
    B(u64),
    C(u8),
}
struct FooRepr {
    data: u64, // 根据 tag 的不同,这一项可以为 u64,u32,或者 u8
    tag: u8,   // 0 = A,1 = B, 2 = C ,大小为一个字节到4个字节之间,参考Option,编辑器有特殊优化
    _pad1: [u8; 3],//字节对齐,以32位为例
}
数组的本质:一串连续的内存空间,内存大小是内部类型的整数倍
切片的本质:两个usize,第一个是指针(内存地址,切片开始的地址),第二个是len(元素的个数,不是内存的长度)
#![allow(unused)]
fn main() {
    struct Nothing; // 无字段意味着没有大小

    // 所有字段都无大小意味着整个结构体无大小
    struct LotsOfNothing {
        foo: Nothing,
        qux: (),      // 空元组无大小
        baz: [u8; 0], // 空数组无大小
    }
}
Vec
栈上占用3个usize的字节(64位,3个u64),第一个是堆上的指针,中间是cap(申请的堆内存可以存放多少值,初始时和len一致,扩容时x2),后一个是len(这个vec有多少个值)
vec是动态数组,也就是说每次扩容,会在堆上新创建一个数组,然后改变指针,他不是链表,不能使用零散的内存
String
类似于Vec,也是3个usize,第一个是指向堆上的u8数组的指针,中间是cap(申请的堆内存可以存放多少值),后一个是len(这个string有几个u8)
同vec,也是动态的
常量
Rust 有两种不同类型的常量,它们可以在任何范围内声明,包括全局。
const:不可更改的值(常见情况)。static: 一个可能mut有'static生命周期的变量。静态生命周期是推断出来的,不必指定。访问或修改可变静态变量是unsafe.
static mut ttt: i32 =12;
const tt: i32 =12;
const和static的区别是const会内联(在内存里不固定,用到的地方编译器硬编码),推荐使用const,单例模式使用static
有内部可变性的类型,使用static(因为const内联,导致常量实际并不是同一个)
变量绑定
let&mut
//不可改变量
let a=1;
//let b:u8=1;
let b=1i8;//原始类型可以后缀
let aa:f32=1.22_f32;
let unit=();
//可改变量
let mut c=12;
shadowing
可改不可改指的是赋值,如果不是赋值,而是重新绑定,不会报错,这个叫 shadowing
let x = 5;
let x = x + 1;
let x = x * 2;
先声明
let a_binding;
    {
        let x = 2;
        // Initialize the binding
        a_binding = x * x;
    }
println!("a binding: {}", a_binding);
这样是没问题的,没有违反不可变变量的规则,因为没有绑定值(类似于java的默认值null),但是此时rust是没法推断类型的,使用会报错
变量冻结
let mut _mutable_integer = 7i32;

{
    // shadowing变量为不可改变量
    let _mutable_integer = _mutable_integer;

    // 修改会报错
    _mutable_integer = 50;
    // FIXME ^ Comment out this line

    // `_mutable_integer` goes out of scope
}

// Ok! `_mutable_integer` 现在恢复为可改变量
_mutable_integer = 3;
类型转换
as
Rust 不提供原始类型之间的隐式类型转换(强制)。但是,可以使用as关键字执行显式类型转换(强制转换)。
let decimal = 65.4321_f32;

// Error! No implicit conversion
let integer: u8 = decimal;
// FIXME ^ Comment out this line

// Explicit conversion
let integer = decimal as u8;
let character = integer as char;
type
该type语句可用于为现有类型赋予新名称。类型必须有UpperCamelCase名称(大坨峰命名),否则编译器会发出警告。唯一例外的规则是基本类型:usize,f32,等。
// `NanoSecond` is a new name for `u64`.
type NanoSecond = u64;
type Inch = u64;

// Use an attribute to silence warning.
#[allow(non_camel_case_types)]
type u64_t = u64;
// TODO ^ Try removing the attribute

fn main() {
    // `NanoSecond` = `Inch` = `u64_t` = `u64`.
    let nanoseconds: NanoSecond = 5 as u64_t;
    let inches: Inch = 2 as u64_t;

    // Note that type aliases *don't* provide any extra type safety, because
    // aliases are *not* new types
    println!("{} nanoseconds + {} inches = {} unit?",
        nanoseconds,
        inches,
        nanoseconds + inches);
}
自定义类型转换
From 和 Into
From函数是结构体关联函数之一,类似于构造器
Into是From反向使用,不需要实现
use std::convert::From;

#[derive(Debug)]
struct Number {
    value: i32,
}

impl From<i32> for Number {
    fn from(item: i32) -> Self {
        Number { value: item }
    }
}

fn main() {
    let num = Number::from(30);
    println!("My number is {:?}", num);
    let int = 5;
    // Try removing the type declaration
    let num: Number = int.into();
    println!("My number is {:?}", num);
}
TryFrom 和 TryInto
类似于FromandInto,TryFrom并且TryInto是用于在类型之间转换的通用Trait。与From/不同Into, TryFrom/TryInto用于易出错的转换,因此返回Results。
use std::convert::TryFrom;
use std::convert::TryInto;

#[derive(Debug, PartialEq)]
struct EvenNumber(i32);

impl TryFrom<i32> for EvenNumber {
    type Error = ();

    fn try_from(value: i32) -> Result<Self, Self::Error> {
        if value % 2 == 0 {
            Ok(EvenNumber(value))
        } else {
            Err(())
        }
    }
}

fn main() {
    // TryFrom

    assert_eq!(EvenNumber::try_from(8), Ok(EvenNumber(8)));
    assert_eq!(EvenNumber::try_from(5), Err(()));

    // TryInto

    let result: Result<EvenNumber, ()> = 8i32.try_into();
    assert_eq!(result, Ok(EvenNumber(8)));
    let result: Result<EvenNumber, ()> = 5i32.try_into();
    assert_eq!(result, Err(()));
}
字符串转化
将任何类型转换为 String需要实现ToString Trait
实现fmt::Display Trait,会默认实现ToString并且还允许打印print!
use std::fmt;

struct Circle {
    radius: i32
}

impl fmt::Display for Circle {
    fn fmt(&self, f: &mut fmt::Formatter) -> fmt::Result {
        write!(f, "Circle of radius {}", self.radius)
    }
}

fn main() {
    let circle = Circle { radius: 6 };
    println!("{}", circle.to_string());
}
解析字符串 实现·FromStr Trait即可
fn main() {
    let parsed: i32 = "5".parse().unwrap();
    let turbo_parsed = "10".parse::<i32>().unwrap();

    let sum = parsed + turbo_parsed;
    println!("Sum: {:?}", sum);
}
流程控制
与大多数语言类似。
rust中条件表达式不需要用括号括起来。
if/else
用if-分支else类似于其他语言。
与它们中的许多不同,布尔条件不需要用括号括起来,每个条件后跟一个块。
if-else条件是表达式,并且可以有返回值,所有分支必须返回相同的类型。
let n = 5;
if n < 0 {
    print!("{} is negative", n);
} else if n > 0 {
    print!("{} is positive", n);
} else {
    print!("{} is zero", n);
}

let big_n =
if n < 10 && n > -10 {
    println!(", and is a small number, increase ten-fold");

    // This expression returns an `i32`.
    10 * n
} else {
    println!(", and is a big number, halve the number");

    // This expression must return an `i32` as well.
    n / 2
    // TODO ^ Try suppressing this expression with a semicolon.
};
//   ^ Don't forget to put a semicolon here! All `let` bindings need it.
println!("{} -> {}", n, big_n);
loop
Rust 提供了一个loop关键字来表示无限循环。
loop也可以有返回值。返回值放在break之后
该break语句可用于随时退出循环,而该 continue语句可用于跳过剩余的迭代并开始新的迭代。
let mut count = 0u32;

println!("Let's count until infinity!");

// Infinite loop
loop {
    count += 1;

    if count == 3 {
        println!("three");

        // Skip the rest of this iteration
        continue;
    }

    println!("{}", count);

    if count == 5 {
        println!("OK, that's enough");

        // Exit this loop
        break;
    }
}
嵌套
嵌套循环必须用 'label标注,并且必须将标签传递给break/continue语句。
'outer: loop {
    println!("Entered the outer loop");

    'inner: loop {
        println!("Entered the inner loop");

        // This would break only the inner loop
        //break;

        // This breaks the outer loop
        break 'outer;
    }

    println!("This point will never be reached");
}

println!("Exited the outer loop");
while
// A counter variable
let mut n = 1;

// Loop while `n` is less than 101
while n < 101 {
    if n % 15 == 0 {
        println!("fizzbuzz");
    } else if n % 3 == 0 {
        println!("fizz");
    } else if n % 5 == 0 {
        println!("buzz");
    } else {
        println!("{}", n);
    }

    // Increment counter
    n += 1;
}
for
语法:
for 表达式 in 范围/迭代器 {}
fn main() {
    // `n` will take the values: 1, 2, ..., 100 in each iteration
    for n in 1..101 {
        if n % 15 == 0 {
            println!("fizzbuzz");
        } else if n % 3 == 0 {
            println!("fizz");
        } else if n % 5 == 0 {
            println!("buzz");
        } else {
            println!("{}", n);
        }
    }
}
或者,a..=b可用于包含两端的范围。上面的可以写成:
fn main() {
    // `n` will take the values: 1, 2, ..., 100 in each iteration
    for n in 1..=100 {
        if n % 15 == 0 {
            println!("fizzbuzz");
        } else if n % 3 == 0 {
            println!("fizz");
        } else if n % 5 == 0 {
            println!("buzz");
        } else {
            println!("{}", n);
        }
    }
}
迭代器
into_iter,iter并且iter_mut都通过提供对其中数据的不同视图,以不同的方式处理集合到迭代器的转换。
iter- 这通过每次迭代借用集合的每个元素。从而使集合保持不变并可在循环后重复使用。
fn main() {
    let names = vec!["Bob", "Frank", "Ferris"];

    for name in names.iter() {
        match name {
            &"Ferris" => println!("There is a rustacean among us!"),
            // TODO ^ Try deleting the & and matching just "Ferris"
            _ => println!("Hello {}", name),
        }
    }

    println!("names: {:?}", names);
}
into_iter- 这会消耗集合,以便在每次迭代时提供准确的数据。一旦集合被消耗,它就不再可用于重用,因为它已在循环中“移动”。
fn main() {
    let names = vec!["Bob", "Frank", "Ferris"];

    for name in names.into_iter() {
        match name {
            "Ferris" => println!("There is a rustacean among us!"),
            _ => println!("Hello {}", name),
        }
    }

    println!("names: {:?}", names);
    // FIXME ^ Comment out this line
}
iter_mut- 这会可变地借用集合的每个元素,允许就地修改集合。
fn main() {
    let mut names = vec!["Bob", "Frank", "Ferris"];

    for name in names.iter_mut() {
        *name = match name {
            &mut "Ferris" => "There is a rustacean among us!",
            _ => "Hello",
        }
    }

    println!("names: {:?}", names);
}
在上面的片段中注意match分支的类型,这是迭代类型的主要区别。类型的差异当然意味着可以执行的不同操作。
match
语法:
match variable {
v1 表达式 =>{},
_=>{}
}
表达式可以用来过滤,模式匹配里面是逗号
基本同scala,但是额外增加了指针的部分
对于指针,需要区分解构和解引用,因为它们是不同的概念
- 解引用
* - 解构使用
&,ref, 和ref mut
fn main() {
    let number = 13;
    // TODO ^ Try different values for `number`

    println!("Tell me about {}", number);
    match number {
        // Match a single value
        1 => println!("One!"),
        // Match several values
        2 | 3 | 5 | 7 | 11 => println!("This is a prime"),
        // TODO ^ Try adding 13 to the list of prime values
        // Match an inclusive range
        13..=19 => println!("A teen"),
        // Handle the rest of cases
        _ => println!("Ain't special"),
        // TODO ^ Try commenting out this catch-all arm
    }

    let boolean = true;
    // Match is an expression too
    let binary = match boolean {
        // The arms of a match must cover all the possible values
        false => 0,
        true => 1,
        // TODO ^ Try commenting out one of these arms
    };

    println!("{} -> {}", boolean, binary);
}
绑定
使用@来绑定多个值,而不需要写多次
// A function `age` which returns a `u32`.
fn age() -> u32 {
    15
}

fn main() {
    println!("Tell me what type of person you are");

    match age() {
        0             => println!("I haven't celebrated my first birthday yet"),
        // Could `match` 1 ..= 12 directly but then what age
        // would the child be? Instead, bind to `n` for the
        // sequence of 1 ..= 12. Now the age can be reported.
        n @ 1  ..= 12 => println!("I'm a child of age {:?}", n),
        n @ 13 ..= 19 => println!("I'm a teen of age {:?}", n),
        // Nothing bound. Return the result.
        n             => println!("I'm an old person of age {:?}", n),
    }
}
if let
语法:
if let 解构 = 变量 {}
if let 和if的区别是,if 是表达式,if let 不是表达式,而是模式匹配(也就是解构)
语法看起来有点奇怪,可以这样理解:这里的=其实就是帮我们省略了这一串模式匹配,只是看起来不太习惯
// Our example enum
enum Foo {
    Bar,
    Baz,
    Qux(u32)
}

fn main() {
    // Create example variables
    let a = Foo::Bar;
    let b = Foo::Baz;
    let c = Foo::Qux(100);

    // Variable a matches Foo::Bar
    if let Foo::Bar = a {
        println!("a is foobar");
    }

    // Variable b does not match Foo::Bar
    // So this will print nothing
    if let Foo::Bar = b {
        println!("b is foobar");
    }

    // Variable c matches Foo::Qux which has a value
    // Similar to Some() in the previous example
    if let Foo::Qux(value) = c {
        println!("c is {}", value);
    }

    // Binding also works with `if let`
    if let Foo::Qux(value @ 100) = c {
        println!("c is one hundred");
    }
}
while let
语法:
while let 解构=变量{}
基本类似于if let,只是外面套了个循环,等同于
loop {
    if match 变量 {
        解构=>break,
        _=>{},
        }
    } {
    //do something
    }
实例:
fn main() {
    // Make `optional` of type `Option<i32>`
    let mut optional = Some(0);

    // This reads: "while `let` destructures `optional` into
    // `Some(i)`, evaluate the block (`{}`). Else `break`.
    while let Some(i) = optional {
        if i > 9 {
            println!("Greater than 9, quit!");
            optional = None;
        } else {
            println!("`i` is `{:?}`. Try again.", i);
            optional = Some(i + 1);
        }
        // ^ Less rightward drift and doesn't require
        // explicitly handling the failing case.
    }
    // ^ `if let` had additional optional `else`/`else if`
    // clauses. `while let` does not have these.
}
Function
签名
fn func_name(var1:type,var2:type) -> type{
}
如果函数的返回值为空(无返回值),则用!表示
fn foo() -> ! {
    panic!("This call never returns.");//必须是使程序结束的指令或者死循环,比如process::exit(1),panic!和loop{}
}
目前闭包的返回值不能是!,但是里面可以写退出或者死循环,这是不稳定功能,非测试版编译不了
如果没有定义返回值,则返回值是空元组(),例如main函数
fn some_fn() {
    ()
}
()和!是不同的,!不转移所有权,也不影响同级别的返回类型(主要在循环和模式匹配里用到这个特性,无感知)
闭包函数
签名:
Fn(u32)->u32
FnMut(u32)->u32
FnOnce(u32)->u32
FnMut和Fn都是借用,一个可变,一个不可变,FnOnce是move,因此只能调用一次
函数也实现了Fn,FnMut,FnOnce,把函数当闭包使用时,不能有(),直接使用函数名即可
但是函数不能使用非自己定义域内的变量,闭包可以(使用定义闭包的定义域的变量)
闭包
闭包是可以捕获封闭环境的函数。例如,一个捕获 x 变量的闭包:
// 语法
//|arg|->return_type{};
//省略
//|arg|exp;
|val| val + x
闭包的语法和功能使其非常便于即时使用。调用闭包就像调用函数一样。但是,可以推断输入和返回类型,并且必须指定输入变量名称。
闭包的其他特征包括:
- 使用
||而不是()围绕输入变量。 {}单个表达式的可选正文分隔 ( )(否则为强制性)。- 捕获外部环境变量的能力。
fn main() {
    // Increment via closures and functions.
    fn function(i: i32) -> i32 { i + 1 }

    // Closures are anonymous, here we are binding them to references
    // Annotation is identical to function annotation but is optional
    // as are the `{}` wrapping the body. These nameless functions
    // are assigned to appropriately named variables.
    let closure_annotated = |i: i32| -> i32 { i + 1 };
    let closure_inferred  = |i     |          i + 1  ;

    let i = 1;
    // Call the function and closures.
    println!("function: {}", function(i));
    println!("closure_annotated: {}", closure_annotated(i));
    println!("closure_inferred: {}", closure_inferred(i));

    // A closure taking no arguments which returns an `i32`.
    // The return type is inferred.
    let one = || 1;
    println!("closure returning one: {}", one());

}
使用闭包函数做参数
虽然 Rust 选择如何在没有类型注释的情况下动态捕获变量,但在编写函数时不允许这种歧义。当将闭包作为输入参数时,闭包的完整类型必须使用以下traits. 按照限制递减的顺序,它们是:
Fn: 闭包通过引用捕获 (&T)FnMut: 闭包由可变引用 (&mut T)捕获FnOnce: 闭包按值捕获 (T)
fn apply<F>(f: F) where
    // The closure takes no input and returns nothing.
    F: FnOnce() {
    // ^ TODO: Try changing this to `Fn` or `FnMut`.

    f();
}
使用闭包函数做返回值
根据定义,匿名闭包类型是未知的,因此我们必须使用它 impl Trait来返回它们。
返回闭包的有效特征是:
FnFnMutFnOnce
返回闭包时,如果闭包函数里使用了其他变量,必须使用move关键字,不能省略
move是用来转移所有权的
//Fn() 是Fn()->()的简写
fn create_fn() -> impl Fn() {
    let text = "Fn".to_owned();

    move || println!("This is a: {}", text)//不能省略move,否则编译不过去
    //||println!("xxxxx")这种是可以不用move的
}

fn create_fnmut() -> impl FnMut() {
    let text = "FnMut".to_owned();

    move || println!("This is a: {}", text)
}

fn create_fnonce() -> impl FnOnce() {
    let text = "FnOnce".to_owned();

    move || println!("This is a: {}", text)
}

fn main() {
    let haystack = vec![1, 2, 3];
    let contains = move |needle| haystack.contains(needle);
    //这里就是把haystack的所有权转给了contains闭包,不加也没关系,也可以运行,只不过变成了借用,加了就是移动
    let fn_plain = create_fn();
    let mut fn_mut = create_fnmut();
    let fn_once = create_fnonce();

    fn_plain();
    fn_mut();
    fn_once();
}
闭包的本质
闭包本质上是编辑器帮你写了代码
以下面这个闭包为例,编辑器实际上帮你实现了FnOnce 的Trait
因此每个闭包都是不同的类型(匿名类型),即使函数签名一致,也不是同类型,在分支模式下会报类型不兼容
// |x:i32|x+1 为例
struct closure1;

impl FnOnce<i32> for closure1 {
    type Output = i32;

     fn call_once(self, args: i32) -> Self::Output {
        args+1
    }
}
高阶函数
函数也是一等公民,可以在函数内定义,或者做表达式,也可以作为返回值或者参数。
//参数
//fn() 是fn()->()的简写
fn apply<F:fn()->()>(f:F)->bool{}

//返回值
fn create_fn() -> fn()->() {}
fn 实现了所有三个闭包 trait(Fn、FnMut 和 FnOnce),所以总是可以在调用期望闭包的函数时传递函数指针作为参数。
Method
方法其实也是函数,但是被绑定到了struct或者enum
#[derive(Debug)]
struct Rectangle {
    width: u32,
    height: u32,
}

impl Rectangle {
    fn new(width:u32,height:u32)->Rectangle{
        Rectangle{width,height}
    }
    fn area(&self) -> u32 {
        self.width * self.height
    }
    /*
    &self其实是self:&Rectangle的缩写,代表方法都是borrow,如果第一个参数不是reference,则是move,会失去所有权,下面这个方法可以和上面一样调用
    fn area(self)-> u32{
        self.width * self.height
    }
    */
}
模式匹配
模式匹配的核心是解构(Pattern),结构可以用在一下地方:
- match
- let
- if let
- while let
- for
- 函数参数
原始匹配
match 语句中可以直接匹配字面常量,下划线_匹配任意情形。
let x = 1;

match x {
    //_x@1 =>println!("one"), //变量名@值 条件守卫

    1 => println!("one"),
    2 => println!("two"),
    3 => println!("three"),
    _ => println!("anything"),
}
以上代码会打印出one。
_和..
_可以在模式匹配或者函数签名中使用,可以忽略某个值(注意是某个,单个值)
以_开头的变量表示忽略未使用,编译器不会警告
..在模式匹配中表示省略剩余的部分(多个值)
匹配值的范围 ..=、x..
该..=、x..语法允许我们以匹配值的包含范围。
ps:x..x 、..x和..都不能在这里使用,因为..x可能包含非零值,而且..和省略语法冲突
    let x = 5;

    match x {
        1..=5 => println!("one through five"),
        6.. => println!("bigger than six ")
        _ => println!("something else"),
    }
结构匹配
match 用于匹配一个表达式的值,寻找满足条件的子分支(arm)并执行。每个子分支包含三部分:一系列模式、可选的守卫条件以及主体代码块。
fn main() {
    let p = Point { x: 0, y: 7 };

    match p {
        Point { x:x, y:y@ 0 } => println!("On the x axis at {}", x),
        //等价于上一个,下面的是简化
        Point { x, y: 0 } => println!("On the x axis at {}", x),

        Point { x:x@ 0, y:y } => println!("On the y axis at {}", y),
        Point { x:0, y } => println!("On the y axis at {}", y),

        Point { x:x, y:y } => println!("On neither axis: ({}, {})", x, y),
        Point { x, y } => println!("On neither axis: ({}, {})", x, y),

    }
}
ps:这里指定了值的内部元素是无法在后续使用的,如果要使用,必须用@绑定后使用
多个模式
每个子分支可以是多个模式,通过 | 符号分割:
let x = 1;

match x {
    1 | 2 => println!("one or two"),
    3 => println!("three"),
    _ => println!("anything"),
}
以上代码打印出one or two。
条件守卫
通过if引入子分支的条件守卫:
enum OptionalInt {
    Value(i32),
    Missing,
}

let x = OptionalInt::Value(5);

match x {
    OptionalInt::Value(i) if i > 5 => println!("Got an int bigger than five!"),
    OptionalInt::Value(..) => println!("Got an int!"),
    OptionalInt::Missing => println!("No such luck."),
}
@绑定
使用@绑定可以将匹配结果绑定到变量上
enum Message {
    Hello { id: i32 },
}

let msg = Message::Hello { id: 5 };

match msg {
    Message::Hello {
        id: id_variable @ 3..=7,
    } => println!("Found an id in range: {}", id_variable),
    Message::Hello { id: 10..=12 } => {
        println!("Found an id in another range")
    }
    Message::Hello { id } => println!("Found some other id: {}", id),
}


let a=15;
match a {
    n@0 => println!("I haven't celebrated my first birthday yet"),
    // Could `match` 1 ..= 12 directly but then what age
    // would the child be? Instead, bind to `n` for the
    // sequence of 1 ..= 12. Now the age can be reported.
    n@1 => println!("I'm a child of age {:?}", n),
    n @ (2..=3|4..)  => println!("I'm a teen of age {:?}", n),
    // Nothing bound. Return the result.
    n @_            => println!("I'm an old person of age {:?}", n),
}
ps:结构体或枚举里面的元素需要明确元素名,后面再跟 变量名@值
泛型
语法
泛型使用<T,U>表示,只支持==大坨峰命名法==,且必须出现在函数名或结构体明后面
// 这个不是泛型
fn reg_fn(_s: S) {}
// 这个才是泛型
fn reg_fn<S>(_s: S) {}
// 实现是指定泛型需要在开始指定
impl<T> GenericVal<T> {}
关联类型
Trait里可以使用type关键字在内部定义泛型,具体实现可以交给关联函数,而不是一定要给结构体实现
trait 中的泛型与关联类型,有如下区别:
-
如果 trait 中包含泛型参数,那么,可以对同一个目标类型,多次 impl 此 trait,每次提供不同的泛型参数。而关联类型方式只允许对目标类型实现一次。
-
如果 trait 中包含泛型参数,那么在具体方法调用的时候,必须加以类型标注以明确使用的是哪一个具体的实现。而关联类型方式具体调用时不需要标注类型(因为不存在模棱两可的情况)。
应用场景:关联类型本质也是泛型,如果struct(或者enum)实现这个trait的时候,对于一个泛型参数,可能会不同的具体类型参数需要实现,就用泛型,但是如果只可能有一种,就用关联类型
附录
| 符号 | 解释 |
|---|---|
T: U |
泛型参数 T 约束于实现了 U 的类型 |
T: 'a |
泛型 T 的生命周期必须长于 'a(意味着该类型不能传递包含生命周期短于 'a 的任何引用) |
T : 'static |
泛型 T 不包含除 ‘static 之外的借用引用 |
'b: 'a |
泛型 'b 生命周期必须长于泛型 'a |
T: ?Sized |
使用一个不定大小的泛型类型 |
'a + trait, trait + trait |
复合类型限制 |
| 符号 | 解释 |
|---|---|
path<...> |
为一个类型中的泛型指定具体参数(如 Vec<u8>) |
path::<...>, method::<...> |
为一个类型、函数或表达式中的方法指定具体泛型,通常指 turbofish(如 "42".parse::<i32>()) |
fn ident<...> ... |
泛型函数定义 |
struct ident<...> ... |
泛型结构体定义 |
enum ident<...> ... |
泛型枚举定义 |
impl<...> ... |
定义泛型实现 |
for<...> type |
高级生命周期限制 |
type<ident=type> |
泛型,其一个或多个泛型必须被指定为特定类型(如 Iterator<Item=T>),即默认类型 |
Trait
pub trait Summary {
    fn summarize(&self) -> String;//抽象函数,impl必须实现

    fn summarize2(&self) -> String{
        String::new("sss")
    }//这是默认实现
}
impl dyn Summary{
    fn trait_object() {
        println!("trait object impl");
    }
}//这里用来实现trait的固有方法,只能使用Summary::trait_object()调用
trait bound
可以使用<T:Trait1+Trait2>来指定多个特质,或者是使用where字句
impl <A: TraitB + TraitC, D: TraitE + TraitF> MyTrait<A, D> for YourType {}

// Expressing bounds with a `where` clause
impl <A, D> MyTrait<A, D> for YourType
where
    A: TraitB + TraitC,
    D: TraitE + TraitF {
}
静态分发&动态分发
使用指针(dyn)则是动态分发,直接使用变量(impl)则是静态分发
静态分发的代码编译期会展开,为每个泛型生成不同的函数,性能最好,但二进制体积变大
动态分发则使用指针,内存大小确定,编译期只生成一个函数,性能略差,但是二进制体积小
用dyn的地方
dyn为动态分发,使用在指针处(&,box..)
- 为Trart实现Trait时
- 实现trait的固有方法时
- 使用Trait的指针时
impl SomeTrait for dyn AnotherTrait{}

impl dyn Summary{
    fn trait_object() {
        println!("trait object impl");
    }
}

fn animal_speak(animal: &dyn Animal) {
    animal.speak();
}
//等同于
fn animal_speak2<T:Animal>(animal: &T) {
    animal.speak();
}
派生
通过 #[derive] 属性,编译器能够提供某些 trait 的基本实现。如果 需要更复杂的行为,这些 trait 也可以手动实现。
下面是可以自动派生的 trait:
- 比较 trait:
Eq,PartialEq,Ord,PartialOrd Clone, 深拷贝,用来从&T创建副本T。Copy,使类型具有 “复制语义”(copy semantics)而非 “移动语义”(move semantics),最好和Clone一起派生。Hash,从&T计算哈希值(hash)。Default, 创建数据类型的一个空实例。Debug,使用{:?}formatter 来格式化一个值。
Sized, Unsize和 ?Sized的关系
-
Sized 标记的是在编译期可确定大小的类型
-
Unsized 标记的是动态大小类型,在编译期无法确定其大小 目前rust中的动态类型有 trait 和 [T] 其中 [T] 代表一定数量的T在内存中的一次排列,但不知道具体的数量,所以大小是未知的。
-
?Sized 标记的类型包含了 Sized 和 Unsized 所标识的两种类型。 所以泛型结构体
struct Bar<T: ?Sized>(T);支持编译期可确定大小类型和动态大小类型两种类型。
动态大小类型的限制规则
- 只可以通过胖指针来操作 Unsize 类型,如
&[T]或者&trait - 变量,参数和枚举变量不能使用动态大小类型
- 结构体中只有最有一个字段可以使用动态大小类型,其他字段不可以使用
指针
引用
&和ref是借用(也叫引用),是rust提供的指针,它们允许你使用值但不获取其所有权
&T + &mut T = T
引用的规则:
-
在任意给定时间,要么 只能有一个可变引用,要么 只能有多个不可变引用。
- 2018使用NLL后,生命周期
-
引用必须总是有效的。
胖指针
指向动态sized类型值的胖指针:使用的内存空间是常规指针所使用的内存空间的两倍,切片(& [i32])这种指针是胖指针(fat pointer);trait对象和切片变量的类型其实是胖指针类型!
ps: trait没有大小,所以实例化时无法确定内存空间,需要第二个usize指定长度(切片指定的是T的个数,trait对象是内容的长度)
Rust中有一个重要的 trait Sized,可以用于区分一个类型是不是 DST类型。
所有的 DST 类型都不受 Sized约束。
我们可以在泛型约束中使用 Sized、!Sized、?Sized 三种写法:
T:Sized代表类型必须是编译期确定大小的,- T:!Sized 代表类型必须是编译期不确定大小的,
- T:?Sized 代表以上两种情况都可以。
裸指针
//*const type 不可变指针
//*mut type 可变指针
// 从引用生成裸指针必须类型一致,但是指针之间的转换不需要
let mut num = 5;

let r1 = &num as *const i32;
let r2 = &mut num as *mut i32;
解引用指针必须要在unsafe块内
智能指针
Box
分配在堆上,内部只保存了一个指针(占用usize的大小)
使用场景
- 当拥有一个无法在编译时确定大小的类型,但又想要在一个要求固定尺寸的上下文环境中使用这个类型的值时。
- 当需要传递大量数据的所有权,但又不希望产生大量数据的复制行为时。
- 当希望拥有一个实现了指定trait的类型值,但又不关心具体的类型时。
Rc & Weak
Rc使用但处理多所有权的情况,比如图结构里,可能有多个节点指向一个节点
Rc底层实现是RcBox,它的数据实际是保存在堆上的
Rc::clone()会使计数器加1,当计数器为0时,堆上的内存释放
enum List {
    Cons(i32, Rc<List>),
    Nil,
}

use crate::List::{Cons, Nil};
use std::rc::Rc;

fn main() {
    let a = Rc::new(Cons(5, Rc::new(Cons(10, Rc::new(Nil)))));
    let b = Cons(3, Rc::clone(&a));
    let c = Cons(4, Rc::clone(&a));
}
但是,如果出现了循环引用,Rc的计数器不能变为0,为了解决这种情况,提出了Weak(弱引用)
Weak同Rc,但是标记的是RcBox里的weak计数器,即使weak不为0,只要strong为0,也会释放
因此Weak的unwrap可能是None
Rc适合强关联,Weak适合弱关联
比如双向链表,children应该是强关联,parent是弱关联
父结点应该拥有其子结点:如果父结点被丢弃了,其子结点也应该被丢弃。然而子结点不应该拥有其父结点:如果丢弃子结点,其父结点应该依然存在。
struct RcBox<T: ?Sized> {
    strong: Cell<usize>,
    weak: Cell<usize>,
    value: T,
}
pub struct Rc<T: ?Sized> {
    ptr: NonNull<RcBox<T>>,
    phantom: PhantomData<RcBox<T>>,
}
pub struct Weak<T: ?Sized> {
    // This is a `NonNull` to allow optimizing the size of this type in enums,
    // but it is not necessarily a valid pointer.
    // `Weak::new` sets this to `usize::MAX` so that it doesn’t need
    // to allocate space on the heap.  That's not a value a real pointer
    // will ever have because RcBox has alignment at least 2.
    // This is only possible when `T: Sized`; unsized `T` never dangle.
    ptr: NonNull<RcBox<T>>,
}

//从Rc生成Weak
let foo = Rc::new(Foo);
let weak_foo = Rc::downgrade(&foo);
let other_weak_foo = Weak::clone(&weak_foo);
Arc & Weak
Arc是一个原子引用计数(Atomically Reference Counted)类型,其特点是:原子性类型工作起来类似原始类型,不过可以安全的在线程间共享。因为线程安全带有性能惩罚,所以并没有默认为所有类型实现原子性,由使用者自由决定。Arc<T>拥有与Rc<T>相同的API,所有Rc版本的程序,只需要将Rc修改为Arc即可编译和运行
 use std::sync::{Mutex, Arc};
 use std::thread;

 fn main() {
     let counter = Arc::new(Mutex::new(0));
     let mut handles = vec![];

     for _ in 0..10 {
         let counter = Arc::clone(&counter);
         let handle = thread::spawn(move || {
             let mut num = counter.lock().unwrap();

             *num += 1;
         });
         handles.push(handle);
     }

     for handle in handles {
         handle.join().unwrap();
     }

     println!("Result: {}", *counter.lock().unwrap());
 }
Cell & RefCell & UnsafeCell
如果一个类型可以通过共享引用&T来改变其内部数据,则该类型具有内部可变性。这个明显违反了Rust的借用规则:共享引用不能改变的。UnsafeCell<T>是Rust中唯一允许的可跳过这个规则的类型。即使UnsafeCell<T>是不可变的,依然可以安全的对其内部数据进行修改。对于UnsafeCell<T>,创建多个&mut UnsafeCell
在UnsafeCell<T>基础上,你可以构建自己的内部可变性类型,某个字段包含为UnsafeCell<T>即可,如标准库中的RefCell<T>,Cell<T>,以及std::sync::atomic中的很多类型。
更准确的定义上说,UnsafeCell<T>是智能指针,但是在其基础上构建出来的Cell<T>,RefCell<T>等并不是智能指针,只能算是container。
对于引用和 Box<T>,借用规则的不可变性作用于编译时。对于RefCell<T>,不可变性作用于运行时,由此产生的差异是:引用如果违反规则得到编译错误,RefCell<T>违反规则会panic并退出
下面以Cell<T>,RefCell<T>举例
 use std::cell::{Cell, RefCell};
 fn main() {
     let cell = Cell::new(1);
     cell.set(5);
     println!("{:?}", cell);

     let ref_cell = RefCell::new(String::new());
     ref_cell.borrow_mut().push_str("hello");
     println!("{:?}", ref_cell);
 }
Cell<T>和RefCell<T>都可以通过共享引用改变内部的T。它们的区别是Cell<T>是直接将T move in和move out,而RefCell是通过可变引用来改变T。所以Cell适合copy type,而RefCell适合handle type。(handle type即智能指针)- 它们都是建立在
UnsafeCell上。UnsafeCellRust 是Rust类型系统的“后门”,可以实现将共享引用转换成可变引用。实现的技巧是按顺序转换类型:&T->*const T-*mut T-> mut T-> &mut T。 - 他们都是非Sync的,所以不能在多线程间共享
Cow
在 Rust 中,缩写 “Cow “代表 “Clone on Write “。它是一个枚举,包含两种状态: 借用(Borrow)和拥有(Owned)。这意味着您可以用它来抽象出您是拥有数据还是只是拥有数据的引用。
当获取可变引用时,cow会发生clone,内部会自动切换成Owned,否则就是创建时的状态。创建时如果是值类型,就是Owned,引用就是Borrow。
所有权和生命周期
每个变量只能有一个owner
移动:除primitives外,所有变量的值使用,入参都会造成所有权转换,使其失效
租借:使用&或者&mut (独占使用权,可修改)标记的变量使用,不会使所有权转换,实质就是指针引用
部分引用:在使用let解构时ref 可以获得引用而不是值,如果只是普通绑定,&和let ref等价
只有显式的let才能转移所有权,否则在函数块结束时会被清除
生命周期
&i32        // 常规引用
&'a i32     // 含有生命周期注释的引用
&'a mut i32 // 可变型含有生命周期注释的引用

fn longer<'a>(s1: &'a str, s2: &'a str) -> &'a str {
    if s2.len() > s1.len() {
        s2
    } else {
        s1
    }
}

//HRTB,如果函数返回值生命周期来自泛型,需要在泛型处定义for,告诉编译器下沉到泛型去检验生命周期(因为小于self)
where for<'a> F: Fn(&'a (u8, u16)) -> &'a u8,

<'a:'b,'b>  强制转换,'a比'b长
省略总结
- 如果是参数只有1个,可以省略
- 没有返回值,可以省略
- 关联函数可以省略(第一个参数是self)
- 只需要标注和返回值相关的生命周期
- 建议:如果返回值确定是static,加上static(测试的时候方便)
Option&Result
Option和Result是rust用来处理空值和错误的一种方式,他们的实现思路是一致的,可以说Option是Result的一种特例
panic
panic是不可恢复的错误,panic会导致程序退出,类似于Java里面的Error,属于程序运行中不可预计(不太可能出现)的错误。
fn main() {
    panic!("crash and burn");
}
当出现 panic 时,程序默认会开始 展开(unwinding),这意味着 Rust 会回溯栈并清理它遇到的每一个函数的数据,不过这个回溯并清理的过程有很多工作。另一种选择是直接 终止(abort),这会不清理数据就退出程序。那么程序所使用的内存需要由操作系统来清理。如果你需要项目的最终二进制文件越小越好,panic 时通过在 Cargo.toml 的 [profile] 部分增加 panic = 'abort',可以由展开切换为终止。例如,如果你想要在release模式中 panic 时直接终止:
[profile.release]
panic = 'abort'
Result
rust使用Result来处理错误,在返回值外面包一层Result来表示程序有可能有错误(异常),如果程序有异常,比如文件不存在,应该返回Err,正常则返回Ok
enum Result<T, E> {
    Ok(T),
    Err(E),
}
Result的两个泛型分别代表正常类型(T)和错误的类型(E)
ps:慎用unwrap和expect,这两个参数会在返回Err时直接panic,写库的话最好不要出现unwrap(写bin可以使用)
Option
Option和Result一样,也是在返回值外包层Option来表示返回值可能是null,如果返回值是null,应该返回None,正常返回Some
Option(或者说两个variants中有一个是zero size的枚举)有特殊的优化:
-
如果T是NoZero,None为0
- 因此我们使用数值型的变量时,如果确定不为0(或者说0没有意义),可以使用NonZeroUsize、NonZeroIsize进行优化
- 同理,使用裸指针时,可以使用NonNull优化
- 这一点同样有用于我们自定义的enum,都可以优化(因此尽可能使用NonZero类型)
-
如果是枚举,None选择不可能值(枚举的变量数)
-
其他加一个标志位(字节对齐,增加一个T的字节位,u8则末尾添一个字节标志位,u32数组则增加4个字节作为标志)
enum Option<T> {
    Some(T),
    None,
}
?传播
Result 和Option都可以使用?进行返回值传播
如果这个函数的返回值类型和调用的函数或变量的类型一致(或Err的类型要能够自动转换),则可以直接使用?来简化代码
?表示如果值为Some或者Ok,则正常进行,如果为None或Err,则直接返回None或Err(所以要求类型一致,None就不需要)
fn read_username_from_file() -> Result<String, io::Error> {
    let f = File::open("hello.txt");
    let mut f = match f {
        Ok(file) => file,
        Err(e) => return Err(e),
    };
    //等价于
    //let mut f=File::open("hello.txt")?;
    ...
}
集合
**线性序列:向量 vec
向量是一种可动态增长的数组,用法和一般数组类似,如果要往向量中增加元素,需要用 mut 来创建。
let mut v = vec![];
vec! 是一个宏,用来创建向量字面量,可以用 push 方法往向量中添加新元素。
Rust 对向量和数组都会做越界检查。
**线性序列:双端队列 VecDeque
双端队列是一种同时具有队列和栈性质的数据结构。
需要显示应用双端队列库
use std::collections::VecDeque;
VecDeque 实现了两种 push 方法,push_front 的行为像栈,push_back 的行为像队列。
通过 get 方法加索引来获取队列中相应值。
**线性序列:链表 LinkedList
Rust 提供的链表是双向链表,允许从任意一端插入或弹出元素,但通常更推荐使用 vec 或 VecDeque,因为后两者更加高效。
对于比较小的对象,使用链表会造成很多浪费,因为双向链表包含2个指针(64位下16个字节),如果保存u8,那就是16倍的浪费
使用链表需要显示引入库
use std::collections::LinkedList;
提供两种方法向链表中添加元素,push_back 和 push_front,同时也提供 append 方法,用来连接两个链表。
Key-Value 映射表:HashMap<K, V>(无序)
key 必须是可哈希的类型,value 必须是在编译器已知大小的类型。
使用前需要显示导入库
use std::collections::HashMap;
let mut hmap = HashMap::new();
通过 insert 方法插入键值对。
Key-Value 映射表:BTreeMap<K, V>(有序)
key 必须是可哈希的类型,value 必须是在编译器已知大小的类型。
使用前需要显示导入库
use std::collections::BtreeMap;
let mut bmap = BtreeMap::new();
通过 insert 方法插入键值对。
**集合:HashSet
集合类型可以看做是没有值的映射表。
使用前需要显示导入库
use std::collections::HashSet;
use std::collections::BtreeSet;
同样使用 insert 方法添加新元素。
**优先队列:BinaryHeap
Rust 提供的优先队列,就是一个二叉最大堆。
使用前需要显示导入库
use std::collections::BinaryHeap;
用 push 方法添加元素,用 peek 方法取出堆中最大值。
属性
当属性应用于整个 crate 时,它们的语法是#![crate_attribute],当它们应用于模块或项目时,语法是#[item_attribute] (注意缺少的 !`)。
属性可以采用不同语法的参数:
#[attribute = "value"]#[attribute(key = "value")]#[attribute(value)]
// `#[allow(dead_code)]` is an attribute that disables the `dead_code` lint
// 死码
#[allow(dead_code)]
fn unused_function() {}


// crate属性
// This crate is a library
#![crate_type = "lib"]
// The library is named "rary"
#![crate_name = "rary"]

// cfg 后面属性匹配 cfg!是宏,后面是布尔表达式,都表示编译的条件,通过条件才编译
// This function only gets compiled if the target OS is linux
#[cfg(target_os = "linux")]
fn are_you_on_linux() {
    println!("You are running linux!");
}
// And this function only gets compiled if the target OS is *not* linux
#[cfg(not(target_os = "linux"))]
fn are_you_on_linux() {
    println!("You are *not* running linux!");
}
模块
rust使用模块来做区分,类似于java的package
rust的结构为crate(类似于根目录的概念)-》item-》module-》结构体、函数
可见性
默认是私有的,如果想从其他模块访问,需要加pub关键字
pub(path) :path用来限定范围
pub修饰的模块可以被父类访问(也限定在里面的pub修饰的东西)
pub use可以使重新定义访问权限,即把非pub子类的方法属性变成自己的pub(拿来主义,缩短路径),使其可以跨mod访问
// A module named `my_mod`
mod my_mod {
    // Items in modules default to private visibility.
    fn private_function() {
        println!("called `my_mod::private_function()`");
    }

    // Use the `pub` modifier to override default visibility.
    pub fn function() {
        println!("called `my_mod::function()`");
    }

    // Items can access other items in the same module,
    // even when private.
    pub fn indirect_access() {
        print!("called `my_mod::indirect_access()`, that\n> ");
        private_function();
    }

    // Modules can also be nested
    pub mod nested {
        pub fn function() {
            println!("called `my_mod::nested::function()`");
        }

        #[allow(dead_code)]
        fn private_function() {
            println!("called `my_mod::nested::private_function()`");
        }

        // Functions declared using `pub(in path)` syntax are only visible
        // within the given path. `path` must be a parent or ancestor module
        pub(in crate::my_mod) fn public_function_in_my_mod() {
            print!("called `my_mod::nested::public_function_in_my_mod()`, that\n> ");
            public_function_in_nested();
        }

        // Functions declared using `pub(self)` syntax are only visible within
        // the current module, which is the same as leaving them private
        pub(self) fn public_function_in_nested() {
            println!("called `my_mod::nested::public_function_in_nested()`");
        }

        // Functions declared using `pub(super)` syntax are only visible within
        // the parent module
        pub(super) fn public_function_in_super_mod() {
            println!("called `my_mod::nested::public_function_in_super_mod()`");
        }
    }

    pub fn call_public_function_in_my_mod() {
        print!("called `my_mod::call_public_function_in_my_mod()`, that\n> ");
        nested::public_function_in_my_mod();
        print!("> ");
        nested::public_function_in_super_mod();
    }

    // pub(crate) makes functions visible only within the current crate
    pub(crate) fn public_function_in_crate() {
        println!("called `my_mod::public_function_in_crate()`");
    }

    // Nested modules follow the same rules for visibility
    mod private_nested {
        #[allow(dead_code)]
        pub fn function() {
            println!("called `my_mod::private_nested::function()`");
        }

        // Private parent items will still restrict the visibility of a child item,
        // even if it is declared as visible within a bigger scope.
        #[allow(dead_code)]
        pub(crate) fn restricted_function() {
            println!("called `my_mod::private_nested::restricted_function()`");
        }
    }
}

fn function() {
    println!("called `function()`");
}

fn main() {
    // Modules allow disambiguation between items that have the same name.
    function();
    my_mod::function();

    // Public items, including those inside nested modules, can be
    // accessed from outside the parent module.
    my_mod::indirect_access();
    my_mod::nested::function();
    my_mod::call_public_function_in_my_mod();

    // pub(crate) items can be called from anywhere in the same crate
    my_mod::public_function_in_crate();

    // pub(in path) items can only be called from within the module specified
    // Error! function `public_function_in_my_mod` is private
    //my_mod::nested::public_function_in_my_mod();
    // TODO ^ Try uncommenting this line

    // Private items of a module cannot be directly accessed, even if
    // nested in a public module:

    // Error! `private_function` is private
    //my_mod::private_function();
    // TODO ^ Try uncommenting this line

    // Error! `private_function` is private
    //my_mod::nested::private_function();
    // TODO ^ Try uncommenting this line

    // Error! `private_nested` is a private module
    //my_mod::private_nested::function();
    // TODO ^ Try uncommenting this line

    // Error! `private_nested` is a private module
    //my_mod::private_nested::restricted_function();
    // TODO ^ Try uncommenting this line
}
文件层次
上面的示例使用单文件嵌套定义,阅读性很差,所以一般使用文件层次来区分
单文件嵌套:类比java,就是一个文件写一个包的所有class,没有public class
文件层次,就是拆分成多个class文件
$ tree .
.
|-- my
|   |-- inaccessible.rs
|   |-- mod.rs //这个是默认文件名,即my模块
|   `-- nested.rs
`-- split.rs
split.rs->my/mod.rs->nested.rs/inacessiable.rs
在split.rs:
// This declaration will look for a file named `my.rs` or `my/mod.rs` and will
// insert its contents inside a module named `my` under this scope
mod my;//这里的mod不是导包的意思,是包含了这个模块的意思

fn function() {
    println!("called `function()`");
}

fn main() {
    my::function();

    function();

    my::indirect_access();

    my::nested::function();
}
在my/mod.rs:
// Similarly `mod inaccessible` and `mod nested` will locate the `nested.rs`
// and `inaccessible.rs` files and insert them here under their respective
// modules
mod inaccessible;
pub mod nested;

pub fn function() {
    println!("called `my::function()`");
}

fn private_function() {
    println!("called `my::private_function()`");
}

pub fn indirect_access() {
    print!("called `my::indirect_access()`, that\n> ");

    private_function();
}
在my/nested.rs:
pub fn function() {
    println!("called `my::nested::function()`");
}

#[allow(dead_code)]
fn private_function() {
    println!("called `my::nested::private_function()`");
}
在my/inaccessible.rs:
#[allow(dead_code)]
pub fn public_function() {
    println!("called `my::inaccessible::public_function()`");
}
嵌套歧义
super 和 self,用在模块嵌套中,区分是哪个的属性/方法
supper::function();
self::function();
导包
使用 use 关键字,用法
use crate::deeply::nested::{
    my_first_function,
    my_second_function,
    AndATraitType
};
use deeply::nested::function as other_function;//起别名
lib
库以“lib”为前缀,默认情况下它们以其 crate 文件命名,但可以通过将--crate-name选项传递给rustc或使用crate_name 属性来覆盖此默认名称。
// This crate is a library
#![crate_type = "lib"]
// The library is named "rary"
#![crate_name = "rary"]
测试
测试分类
单元测试
单元测试是在每个模块内包含的一个测试模块(子模块),用来测试本模块的方法
测试模块可以测试任何函数,包括私有,不受限制
可以把单元测试单独提出来作为一个文件
.
├── Cargo.lock
├── Cargo.toml
├── src
│   ├── log
│   │   └── tests.rs
│   ├── log.rs
│   ├── lib.rs
│   └── tests.rs
└── tests
    └── tests.rs


.
├── Cargo.lock
├── Cargo.toml
├── src
│   ├── log
│   │   ├── mod.rs
│   │   └── tests.rs
│   ├── main.rs
│   └── tests.rs
└── tests
    └── tests.rs
#[cfg(test)] //这个是让编译器只在测试的时候编译
mod tests {
    use crate::*;

    #[test] //告诉编译器这是测试函数
    fn one_search() {
        let query = "duct";
        let contents = "\
Rust:
safe, fast, productive.
Pick three.";
        let res = search(query, contents);
        assert_eq!(vec!["safe, fast, productive."], res,
                   "expect Vec[\"safe, fast, productive.\"]")
    }
}
集成测试
集成测试是用来测试整个crate对外暴露的方法的,即和src并列的tests文件夹
tests内的每个文件都是一个crate,可以调用另一个crate的pub方法/类(和单元测试不同,不能随意测试)
#[test]
fn whole(){
    assert_eq!(2 + 2, 4);
}
文档测试
文档测试是用来测试文档注释里的example的,用来保证更新之后样例代码能正常使用
- 必须是markdown的代码块包裹
- 必须是lib(或者包含lib+main)
- 可以使用#隐藏(docs看不见,用来解决?和返回值的问题)
/// 第一行是对函数的简短描述。
///
/// 接下来数行是详细文档。代码块用三个反引号开启,Rust 会隐式地在其中添加
/// `fn main()` 和 `extern crate <cratename>`。比如测试 `doccomments` crate:
///
/// ```
/// let result = doccomments::add(2, 3);
/// assert_eq!(result, 5);
/// ```
pub fn add(a: i32, b: i32) -> i32 {
    a + b
}

/// 文档注释通常可能带有 "Examples"、"Panics" 和 "Failures" 这些部分。
///
/// 下面的函数将两数相除。
///
/// # Examples
///
/// ```
/// let result = doccomments::div(10, 2);
/// assert_eq!(result, 5);
/// ```
///
/// # Panics
///
/// 如果第二个参数是 0,函数将会 panic。
///
/// ```rust,should_panic
/// // panics on division by zero
/// doccomments::div(10, 0);
/// ```
pub fn div(a: i32, b: i32) -> i32 {
    if b == 0 {
        panic!("Divide-by-zero error");
    }

    a / b
}
/// 在文档测试中使用隐藏的 `try_main`。
///
/// ```
/// # // 被隐藏的行以 `#` 开始,但它们仍然会被编译!被隐藏意味着docs不可见
/// # fn try_main() -> Result<(), String> { // 隐藏行包围了文档中显示的函数体
///  use uname::log::try_div;
///  let res = try_div(10, 2)?;
/// # Ok(()) // 从 try_main 返回
/// # }
/// # fn main() { // 开始主函数,其中将展开 `try_main` 函数
/// #    try_main().unwrap(); // 调用并展开 try_main,这样出错时测试会 panic
/// # }
测试方法
assert
- assert
- assert_eq
- assert_ne
都可以在参数追加额外信息,一般assert加就好了
 #[test]
    fn one_search() {
        let query = "duct";
        let contents = "\
Rust:
safe, fast, productive.
Pick three.";
        let res = search(query, contents);
        assert_eq!(vec!["safe, fast, productive."], res,
                   "expect Vec[\"safe, fast, productive.\"]")
    }
should_panic
#[cfg(test)]
mod tests {
    use super::*;

    #[test]
    #[should_panic]
    fn greater_than_100() {
        Guess::new(200);
    }
    //or
    #[test]
    #[should_panic(expected = "Guess value must be less than or equal to 100")]//可选参数,特定的pinic
    fn greater_than_100() {
        Guess::new(200);
    }
}
Result
#[cfg(test)]
mod tests {
    #[test]
    fn it_works() -> Result<(), String> {
        if 2 + 2 == 4 {
            Ok(())//注意,必须返回空元组
        } else {
            Err(String::from("two plus two does not equal four"))
        }
    }
}
Cargo
lib&bin
一个项目里只能包含一个lib,但可以包含多个bin
使用其他bin可以用:cargo run --bin multi-file-executable
.
├── Cargo.lock
├── Cargo.toml
├── src/
│   ├── lib.rs
│   ├── main.rs
│   └── bin/
│       ├── named-executable.rs
│       ├── another-executable.rs
│       └── multi-file-executable/
│           ├── main.rs
│           └── some_module.rs
├── benches/
│   ├── large-input.rs
│   └── multi-file-bench/
│       ├── main.rs
│       └── bench_module.rs
├── examples/
│   ├── simple.rs
│   └── multi-file-example/
│       ├── main.rs
│       └── ex_module.rs
└── tests/
    ├── some-integration-tests.rs
    └── multi-file-test/
        ├── main.rs
        └── test_module.rs
开发依赖
有时仅在测试中才需要一些依赖(比如基准测试相关的)。这种依赖要写在 Cargo.toml 的 [dev-dependencies] 部分。这些依赖不会传播给其他依赖于这个包的包。
比如说使用 pretty_assertions,这是扩展了标准的 assert! 宏的一个 crate。
文件 Cargo.toml:
# 这里省略了标准的 crate 数据
[dev-dependencies]
pretty_assertions = "0.4.0"
文件 src/lib.rs:
// 仅用于测试的外部 crate
#[cfg(test)]
#[macro_use]
extern crate pretty_assertions;

pub fn add(a: i32, b: i32) -> i32 {
    a + b
}

#[cfg(test)]
mod tests {
    use super::*;

    #[test]
    fn test_add() {
        assert_eq!(add(2, 3), 5);
    }
}
unsafe
- 解引用裸指针
- 通过 FFI 调用函数(这已经在之前的章节介绍过了)
- 调用不安全的函数
- 内联汇编(inline assembly)
宏!
“The Little Book of Rust Macros”。
在 Rust 中宏分为两大类:声明式宏( declarative macros ) macro_rules! 和三种过程宏( procedural macros ):
#[derive],在之前多次见到的派生宏,可以为目标结构体或枚举派生指定的代码,例如Debug特征- 类属性宏(Attribute-like macro),用于为目标添加自定义的属性
- 类函数宏(Function-like macro),看上去就像是函数调用
声明式宏
在 Rust 中使用最广的就是声明式宏,它们也有一些其它的称呼,例如示例宏( macros by example )、macro_rules! 或干脆直接称呼为宏。
声明式宏允许我们写出类似 match 的代码。match 表达式是一个控制结构,其接收一个表达式,然后将表达式的结果与多个模式进行匹配,一旦匹配了某个模式,则该模式相关联的代码将被执行:
match target {
    模式1 => 表达式1,
    模式2 => {
        语句1;
        语句2;
        表达式2
    },
    _ => 表达式3
}
过程宏
作用域
宏是有顺序的,调用宏的代码必须在宏定义之后,但是宏与宏之间没有顺序要求。
宏的作用域是可以突破mod的。
标准库
thread
Rust 通过 spawn 函数提供了创建本地操作系统(native OS)线程的机制,该函数的参数是一个通过值捕获变量的闭包(moving closure)。
use std::thread;

static NTHREADS: i32 = 10;

// 这是主(`main`)线程
fn main() {
    // 提供一个 vector 来存放所创建的子线程(children)。
    let mut children = vec![];

    for i in 0..NTHREADS {
        // 启动(spin up)另一个线程
        children.push(thread::spawn(move || {
            println!("this is thread number {}", i)
        }));
    }

    for child in children {
        // 等待线程结束。返回一个结果。
        let _ = child.join();
    }
}
channel
mpsc 是 多个生产者,单个消费者(multiple producer, single consumer)的缩写。简而言之,Rust 标准库实现通道的方式意味着一个通道可以有多个产生值的 发送(sending)端,但只能有一个消费这些值的 接收(receiving)端
use std::sync::mpsc::{Sender, Receiver};
use std::sync::mpsc;
use std::thread;

static NTHREADS: i32 = 3;

fn main() {
    // 通道有两个端点:`Sender<T>` 和 `Receiver<T>`,其中 `T` 是要发送
    // 的消息的类型(类型标注是可选的)
    let (tx, rx): (Sender<i32>, Receiver<i32>) = mpsc::channel();

    for id in 0..NTHREADS {
        // sender 端可被复制
        let thread_tx = tx.clone();

        // 每个线程都将通过通道来发送它的 id
        thread::spawn(move || {
            // 被创建的线程取得 `thread_tx` 的所有权
            // 每个线程都把消息放在通道的消息队列中
            thread_tx.send(id).unwrap();

            // 发送是一个非阻塞(non-blocking)操作,线程将在发送完消息后
            // 会立即继续进行
            println!("thread {} finished", id);
        });
    }

    // 所有消息都在此处被收集
    let mut ids = Vec::with_capacity(NTHREADS as usize);
    for _ in 0..NTHREADS {
        // `recv` 方法从通道中拿到一个消息
        // 若无可用消息的话,`recv` 将阻止当前线程
        ids.push(rx.recv());
    }

    // 显示消息被发送的次序
    println!("{:?}", ids);
}
path
Path 结构体代表了底层文件系统的文件路径。Path 分为两种:posix::Path,针对 类 UNIX 系统;以及 windows::Path,针对 Windows。prelude 会选择并输出符合平台类型 的 Path 种类。
译注:prelude 是 Rust 自动地在每个程序中导入的一些通用的东西,这样我们就不必每写 一个程序就手动导入一番。
Path 可从 OsStr 类型创建,并且它提供数种方法,用于获取路径指向的文件/目录 的信息。
注意 Path 在内部并不是用 UTF-8 字符串表示的,而是存储为若干字节(Vec<u8>)的 vector。因此,将 Path 转化成 &str 并非零开销的(free),且可能失败(因此它 返回一个 Option)。
use std::path::Path;

fn main() {
    // 从 `&'static str` 创建一个 `Path`
    let path = Path::new(".");

    // `display` 方法返回一个可显示(showable)的结构体
    let display = path.display();

    // `join` 使用操作系统特定的分隔符来合并路径到一个字节容器,并返回新的路径
    let new_path = path.join("a").join("b");

    // 将路径转换成一个字符串切片
    match new_path.to_str() {
        None => panic!("new path is not a valid UTF-8 sequence"),
        Some(s) => println!("new path is {}", s),
    }
}
file
fs::File::open()

fs::File::create()

fs::OpenOptions::new().append(true).open("");
process
process::Output 结构体表示已结束的子进程(child process)的输出,而 process::Command 结构体是一个进程创建者(process builder)。
use std::process::Command;

fn main() {
    let output = Command::new("rustc")
        .arg("--version")
        .output().unwrap_or_else(|e| {
            panic!("failed to execute process: {}", e)
    });

    if output.status.success() {
        let s = String::from_utf8_lossy(&output.stdout);

        print!("rustc succeeded and stdout was:\n{}", s);
    } else {
        let s = String::from_utf8_lossy(&output.stderr);

        print!("rustc failed and stderr was:\n{}", s);
    }
}
std::Child 结构体代表了一个正在运行的子进程,它暴露了 stdin(标准 输入),stdout(标准输出) 和 stderr(标准错误) 句柄,从而可以通过管道与 所代表的进程交互。
use std::error::Error;
use std::io::prelude::*;
use std::process::{Command, Stdio};

static PANGRAM: &'static str =
"the quick brown fox jumped over the lazy dog\n";

fn main() {
    // 启动 `wc` 命令
    let process = match Command::new("wc")
                                .stdin(Stdio::piped())
                                .stdout(Stdio::piped())
                                .stderr(Stdio::piped())
                                .spawn() {
        Err(why) => panic!("couldn't spawn wc: {}", why.description()),
        Ok(process) => process,
    };

    // 将字符串写入 `wc` 的 `stdin`。
    //
    // `stdin` 拥有 `Option<ChildStdin>` 类型,不过我们已经知道这个实例不为空值,
    // 因而可以直接 `unwrap 它。
    match process.stdin.unwrap().write_all(PANGRAM.as_bytes()) {
        Err(why) => panic!("couldn't write to wc stdin: {}",
                           why.description()),
        Ok(_) => println!("sent pangram to wc"),
    }

    // 因为 `stdin` 在上面调用后就不再存活,所以它被 `drop` 了,管道也被关闭。
    //
    // 这点非常重要,因为否则 `wc` 就不会开始处理我们刚刚发送的输入。

    // `stdout` 字段也拥有 `Option<ChildStdout>` 类型,所以必需解包。
    let mut s = String::new();
    match process.stdout.unwrap().read_to_string(&mut s) {
        Err(why) => panic!("couldn't read wc stdout: {}",
                           why.description()),
        Ok(_) => print!("wc responded with:\n{}", s),
    }
}
如果你想等待一个 process::Child 完成,就必须调用 Child::wait,这会返回 一个 process::ExitStatus。
use std::process::Command;

fn main() {
    let mut child = Command::new("sleep").arg("5").spawn().unwrap();
    let _result = child.wait().unwrap();

    println!("reached end of main");
}
filesystem
std::io::fs 模块包含几个处理文件系统的函数。
use std::fs;
use std::fs::{File, OpenOptions};
use std::io;
use std::io::prelude::*;
use std::os::unix;
use std::path::Path;

// `% cat path` 的简单实现
fn cat(path: &Path) -> io::Result<String> {
    let mut f = File::open(path)?;
    let mut s = String::new();
    match f.read_to_string(&mut s) {
        Ok(_) => Ok(s),
        Err(e) => Err(e),
    }
}

// `% echo s > path` 的简单实现
fn echo(s: &str, path: &Path) -> io::Result<()> {
    let mut f = File::create(path)?;

    f.write_all(s.as_bytes())
}

// `% touch path` 的简单实现(忽略已存在的文件)
fn touch(path: &Path) -> io::Result<()> {
    match OpenOptions::new().create(true).write(true).open(path) {
        Ok(_) => Ok(()),
        Err(e) => Err(e),
    }
}

fn main() {
    println!("`mkdir a`");
    // 创建一个目录,返回 `io::Result<()>`
    match fs::create_dir("a") {
        Err(why) => println!("! {:?}", why.kind()),
        Ok(_) => {},
    }

    println!("`echo hello > a/b.txt`");
    // 前面的匹配可以用 `unwrap_or_else` 方法简化
    echo("hello", &Path::new("a/b.txt")).unwrap_or_else(|why| {
        println!("! {:?}", why.kind());
    });

    println!("`mkdir -p a/c/d`");
    // 递归地创建一个目录,返回 `io::Result<()>`
    fs::create_dir_all("a/c/d").unwrap_or_else(|why| {
        println!("! {:?}", why.kind());
    });

    println!("`touch a/c/e.txt`");
    touch(&Path::new("a/c/e.txt")).unwrap_or_else(|why| {
        println!("! {:?}", why.kind());
    });

    println!("`ln -s ../b.txt a/c/b.txt`");
    // 创建一个符号链接,返回 `io::Resutl<()>`
    if cfg!(target_family = "unix") {
        unix::fs::symlink("../b.txt", "a/c/b.txt").unwrap_or_else(|why| {
        println!("! {:?}", why.kind());
        });
    }

    println!("`cat a/c/b.txt`");
    match cat(&Path::new("a/c/b.txt")) {
        Err(why) => println!("! {:?}", why.kind()),
        Ok(s) => println!("> {}", s),
    }

    println!("`ls a`");
    // 读取目录的内容,返回 `io::Result<Vec<Path>>`
    match fs::read_dir("a") {
        Err(why) => println!("! {:?}", why.kind()),
        Ok(paths) => for path in paths {
            println!("> {:?}", path.unwrap().path());
        },
    }

    println!("`rm a/c/e.txt`");
    // 删除一个文件,返回 `io::Result<()>`
    fs::remove_file("a/c/e.txt").unwrap_or_else(|why| {
        println!("! {:?}", why.kind());
    });

    println!("`rmdir a/c/d`");
    // 移除一个空目录,返回 `io::Result<()>`
    fs::remove_dir("a/c/d").unwrap_or_else(|why| {
        println!("! {:?}", why.kind());
    });
}
下面是所期望的成功的输出:
$ rustc fs.rs && ./fs
`mkdir a`
`echo hello > a/b.txt`
`mkdir -p a/c/d`
`touch a/c/e.txt`
`ln -s ../b.txt a/c/b.txt`
`cat a/c/b.txt`
> hello
`ls a`
> a/b.txt
> a/c
`walk a`
> a/c
> a/c/b.txt
> a/c/e.txt
> a/c/d
> a/b.txt
`rm a/c/e.txt`
`rmdir a/c/d`
env
use std::{env, process};
use minigrep::*;
use std::env::Args;

fn main() {
    let args = env::args();

    let config = parse_config(args).unwrap_or_else(|err| {
        eprintln!("Problem parsing arguments: {}", err);
        process::exit(1);
    });
    ...
}

fn parse_config(mut args: Args) -> Result<Config, &'static str> {
    args.next();
    let query = match args.next() {
        Some(x) => x,
        None => return Err("Didn't get query parameter!")
    };
    let file = match args.next() {
        Some(x) => x,
        None => return Err("Didn't get file parameter!")
    };
    let case_sensitive = env::var("CASE_SENSITIVE").is_ok();
    // println!("{}", case_sensitive);
    Ok(Config::new(query, file, case_sensitive))
}
ffi
并发
Send&Sync
- 如果将一个类型发送(move)到另一个线程是安全的,那么它就是
Send - 如果一个类型可以安全地在线程间共享,那么它就是
Sync的(当且仅当&T是Send时,T是Sync的)
Send 和 Sync 也是自动派生的 Trait。这意味着,你不需要去实现它,如果一个类型完全由 Send 或 Sync 类型组成,那么它就是 Send 或 Sync。几乎所有的基本数据类型都是Send和Sync,因此,几乎所有你将与之交互的类型都是Send和Sync。
主要的例外情况包括:
- 裸指针既不是 Send 也不是 Sync(因为它们没有安全防护)
UnsafeCell不是 Sync 的(因此Cell和RefCell也不是)Rc不是 Send 或 Sync 的(因为 Refcount 是共享的、不同步的)
并发时如果生命周期不是静态(否则可能传过去一个空指针),不能传递引用(所以必须使用move,变成FnOnce),因此传递指针时,使用Arc
引用其实也不是Send和Sync的,所以使用时只能是FnOnce(加move),move的实际是所指向的值,而不是引用(看起来可能会有一点点误解)
impl<'b, T> !Send for Ref<'b, T>
impl<'b, T> !Send for RefMut<'b, T>
并发包
Arc
见上文智能指针Arc
Mutex&RwLock
互斥器即互斥锁,每次drop时都会自动释放锁,所以不需要我们unlock
固定搭配是Arc(如果不是多线程,也不需要Mutex;也可以直接设置成static(不能是const,因为内联),但是这样就不会释放内存了,)
use std::sync::{Mutex, Arc};
use std::thread;

fn main() {
    let counter = Arc::new(Mutex::new(0));
    let mut handles = vec![];

    for _ in 0..10 {
        let counter = Arc::clone(&counter);
        let handle = thread::spawn(move || {
            let mut num = counter.lock().unwrap();

            *num += 1;
        });
        handles.push(handle);
    }

    for handle in handles {
        handle.join().unwrap();
    }

    println!("Result: {}", *counter.lock().unwrap());
}
Mutex实质上也实现了内部可变性,所以不需要RefCell和Cell
RwLock读写锁同Mutex,也实现了内部可变性,多线程中使用
atomic
原子类型,类似锁机制,固定搭配Arc
use std::sync::Arc;
use std::sync::atomic::{AtomicUsize, Ordering};
use std::thread;

fn main() {
    let spinlock = Arc::new(AtomicUsize::new(1));

    let spinlock_clone = spinlock.clone();
    let thread = thread::spawn(move|| {
        spinlock_clone.store(0, Ordering::SeqCst);
    });

    // Wait for the other thread to release the lock
    while spinlock.load(Ordering::SeqCst) != 0 {}

    if let Err(panic) = thread.join() {
        println!("Thread had an error: {:?}", panic);
    }
}
这里需要内存屏障的知识,同java,C++等
内存屏障是限制单线程的,只是多线程中有不同的行为,需要有不同的使用方式
不同的排序语义所阻止的重排序是:
- Relaxed, 这是最宽松的规则,它对编译器和 CPU 不做任何限制,可以乱序
- Release 释放,设定内存屏障(Memory barrier),保证它之前的读写内存操作永远在它store之前,但是它后面的操作可能被重排到它store前面
- Acquire 获取, 设定内存屏障,保证在它之后的读写内存操作永远在它load之后(写操作不一定),但是它之前的操作却有可能被重排到它load后面,往往和
Release在不同线程中联合使用 - AcqRel, Acquire和Release的结合,同时拥有它们俩提供的保证。比如你要对一个
atomic自增 1,同时希望该操作之前和之后的读取或写入操作不会被重新排序 - SeqCst 顺序一致性,
SeqCst就像是AcqRel的加强版,最严格的 ordering,除了AcqRel的保证外,它还保证所有线程看到的所有的SeqCst操作的顺序是一致的。
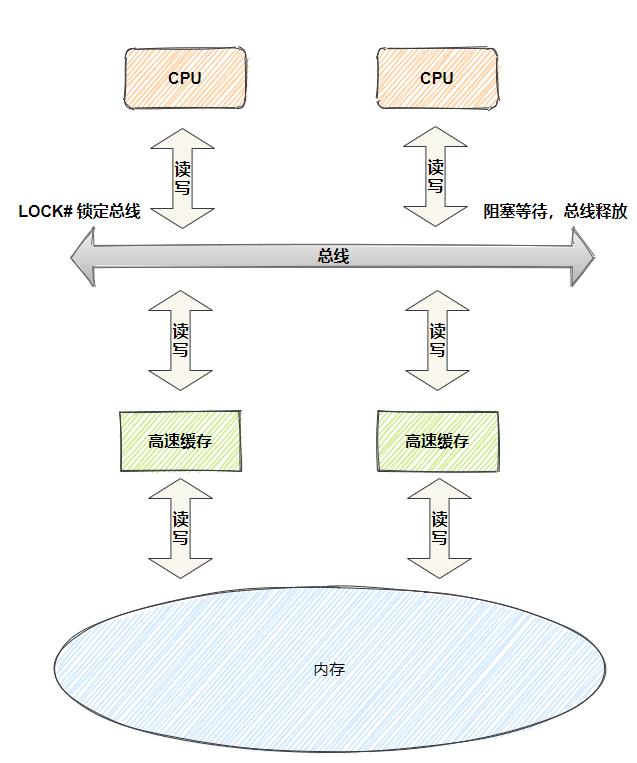
因为在编译器和CPU优化之后,代码顺序和我们写的顺序不一定一样,有些逻辑可能是和执行顺序有关的(比如两个完全无关的变量,但是假定他们会同时修改,如果这个时候根据其中一个的值来判断存在与否,可能获得错误结果),单线程下没有问题,但是多线程下顺序不同结果不同,这个时候就需要使用内存屏障。
AcqRel和SeqCst区别:
AcqRel中修改两个变量,其他线程看到的顺序可能是不同的,SeqCst不会出现这种情况
这里是因为Acquire,Release模型不会主动去刷新CPU缓存,因此其他线程看到的顺序取决于自己的使用顺序,但是SeqCst会主动去刷新CPU的缓存,强制告诉其他线程数据变更了,因此性能最低
如何理解 C++11 的六种 memory order? - 知乎 (zhihu.com)
标准::memory_order - cppreference.com
| [Rust标准库中的原子类型 | Rust学习笔记 (skyao.io)](https://skyao.io/learning-rust/std/sync/atomic-type.html) |
mpsc
见上文channel
Barrier
让多个线程等待,直到数据全部达到再计算,固定搭配Arc
use std::sync::{Arc, Barrier};
use std::thread;

let mut handles = Vec::with_capacity(10);
let barrier = Arc::new(Barrier::new(10));
for _ in 0..10 {
    let c = barrier.clone();
    // The same messages will be printed together.
    // You will NOT see any interleaving.
    handles.push(thread::spawn(move|| {
        println!("before wait");
        c.wait();
        println!("after wait");
    }));
}
// Wait for other threads to finish.
for handle in handles {
    handle.join().unwrap();
}
wait 方法
屏蔽当前线程,直到所有线程在这里会合。
Barrier在所有线程会合后可以重复使用,并且可以连续使用。
单个(任意)线程在从这个函数返回时,会收到一个 is_leader返回 true 的 BarrierWaitResult,其他所有线程都会收到is_leader返回false的结果。
Condvar
阻止当前线程,直到这个条件变量收到通知,wait时会让出执行权,直到被唤醒
每次notify时,所有阻塞的线程都会被唤醒,重新获取锁,但是此时数据有可能并没有变更
use std::sync::{Arc, Mutex, Condvar};
use std::thread;

let pair = Arc::new((Mutex::new(false), Condvar::new()));
let pair2 = pair.clone();


thread::spawn(move|| {
    let (lock, cvar) = &*pair2;
    let mut started = lock.lock().unwrap();
    *started = true;
    // 很重要,条件变更时需要唤醒其他线程
    cvar.notify_one();
});

//
let (lock, cvar) = &*pair;
let mut started = lock.lock().unwrap();
while !*started {
    started = cvar.wait(started).unwrap();
}
//---------------------------------------------
// Wait for the thread to start up.
let (lock, cvar) = &*pair;
// As long as the value inside the `Mutex<bool>` is `true`, we wait.
let _guard = cvar.wait_while(lock.lock().unwrap(), |pending| { *pending }).unwrap();
| [Rust标准库中的条件变量(Condvar) | Rust学习笔记 (skyao.io)](https://skyao.io/learning-rust/std/sync/condvar.html) |
Once
全局只执行一次的操作
use std::sync::Once;

static mut VAL: usize = 0;
static INIT: Once = Once::new();

//call_once全局只执行一次,第二次调用不执行
fn get_cached_val() -> usize {
    unsafe {
        INIT.call_once(|| {
            VAL = expensive_computation();
        });
        VAL
    }
}

fn expensive_computation() -> usize {
    // ...
}
异步
异步是无栈协程,需要runtime,由库提供,运行时底层是线程池,库会对IO等做封装。
理解一下Future,rust把Future分成了Leaf Future和Non-Leaf Future,我们使用async写的Future叫做Non-Leaf Future,Leaf Future(就是没有Pending,直接Ready的future,包装系统调用)
这些库的运行时没有go的功能多,主要是依赖Reactor和Executor,Executor是个调度器+线程池,Reactor是一个回调处理器
- Executor是接受Future执行的一个线程(所有的非异步代码都是在当前线程或者线程池做的,每次spawn的所有东西都是在一个线程)
- 在拿到future的时候,他会检查这个future有没有poll过,没有就创建个waker,然后把waker发送给Reactor,然后挂起future
- 有poll过的话就执行poll,Pending就继续挂起(其实就是什么都不做),Ready的话就返回
- 一次poll就是一次轮询
- Reactor是个存储Waker的容器
- 当回调触发时(比如系统io完成,或者某个future完成),触发对应waker的wake方法
- wake方法会让Executor执行一次轮询(Executor可能需要一个队列来存储future,因为Executor可能正在忙)
工作线程是个event loop,会不停的从队列里拿task来执行
task(就是实际的future)提供schedule,run等方法,run会轮询一次,轮询的结果如果是Pending并且没执行过,就执行schedule
schedule就是闭包的指针,也就是我们写的代码,注意schedule里面如果还有future.await,会加入executor队列里
waker是个指针,可以unsafe转成task的指针(run方法替换成wake方法),每次wake会把自己放进executor的队列里,如果executor没有waker了,就sleep,新的task会唤醒线程
wake方法与run不同的是,不需要再执行poll方法,直接把状态改为SCHEDULED,并尝试执行schedule(这里的schedule是后半段代码,同Generator,代码会被分割成两个闭包)
wake为什么不需要poll?因为waker触发的话,就表示已经Ready了
async会让函数或代码块返回future,await会触发异步任务的执行()
Pin
Pin是个对指针的封装,表示他里面的指针如果不是Unpin的就不能改变(获得mut),如果是Unpin的,则无任何影响
Unpin是默认实现的,不需要主动实现
这个trait主要是解决自引用的问题,如果一个类里有自引用的指针,复制或者move时就会出问题(指针复制,但是指向的地址还是旧的,就不再指向自己了),解决方案就是加个标记,这种情况不能复制和move,这个标记就是Pin,如果有自引用,使用PhantomPinned(mark类型,或者手动实现!Unpin)
//为什么编译报错?
//其实Pin就是指针再包一层,内存结构就是指针,只不过类型变成Pin
//如果Pin里面的指针属于Unpin,就是正常指针,可以获得mut
//但是如果Pin里面不确定属于Unpin,就不能获得mut
//Box,Pin都是Unpin,所以只要套一层就可以获得mut,直接使用Future是不能获得mut的
//使用Pin<Box>就是为了避免使用unsafe,如果使用unsafe,就没必要使用Pin了
//
//看main.rs

//    let mut unp = Unp { a: 1, b: 2,marker:PhantomPinned };
//     let mut pin = unsafe { Pin::new_unchecked(&mut unp) };
//     let tmp=&mut pin.a;//不能获取mut,因Unp为没有实现Unpin

if let Some(a) = &mut self.a {
    let pin= unsafe{ Pin::new_unchecked(a) };
    // let pin = Pin::new(a).as_mut();
    if let Poll::Ready(()) = pin.poll(cx) {
        self.a.take();
    }
}

// 尝试完成 future `b`.
if let Some(b ) =  &mut self.b {
    let pin= unsafe{ Pin::new_unchecked(b) };
    if let Poll::Ready(()) = pin.poll(cx) {
        self.b.take();
    }
}
如果按照事件触发(Promise/Future)想,Future就是阻塞结束之后做的工作,系统调用可以分成两部分(等待-触发执行)
rust不是这么做的